Free Beginner Lessons for Piano – Right Hand 1
 Welcome to Get Piano Lesson 3. Here we’ll work on a series of beginner lessons for piano to develop our fingering ability and hand-eye coordination by playing 5-note finger patterns in the C Major position.
In order to perform these exercises properly, we will essentially be learning the beginnings of sight-reading.
But as I promised on my homepage, I will not bore you with the tedious note reading, key signatures, sharps, flats, rests, or trying to figure out which note gets a half or whole beat.
No, I will cover that brilliant stuff much later on after we’ve first had a chance to do the fun stuff!
If possible, try to position your computer or laptop next to your piano keyboard to get the most out of these online beginner lessons for piano.
Want to Watch a Brief Introduction to
Sight-Reading? Check This Video Out!
Right Hand
Since the right hand is often the lead hand when it comes to piano playing, we’re going to begin our first set of exercises with our right hand in the C major position on the keyboard.
First, it’s important to remember how we’ve arranged our fingers into an easy to understand numbered fingering system:
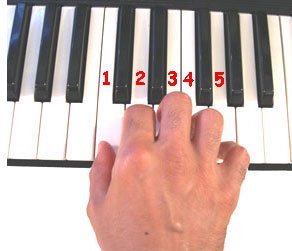 No. 1 = Thumb
No. 2 = Index finger
No. 3 = Middle finger
No. 4 = Ring finger
No. 5 = Little finger
Exercise One
Now we’re going to really begin to drill the numbering system into our heads by playing a series of five short beginner lessons for piano. Take a look at the fifteen numbers written on the green chalkboard below…
Each number represents a note on your keyboard that will be played by the appropriate right hand finger. Number 1, which will be played with our thumb, is obviously Middle C.
We don’t need to be concerned with the names of the other four numbers to the right of Middle C at this time.
All we need to know at this point is
which fingers will play those other four notes.
Our “numbered finger system” makes that very easy to understand as we play these beginner lessons for piano.
With your right hand locked in the Middle C position (Position 1) on your piano keyboard, study the fifteen numbers written on the chalkboard. Slowly begin to play each note one by one…

Remember to keep your fingers curved and you wrists up. Play each note steadily and evenly, without looking at your fingers.
Sound hard to do? Actually, if you’ve got all five fingers placed exactly where they should be, this couldn’t be easier. You already know that your middle finger is number 3 and that your index finger is number 2.
So when you see number 2 or 3 one the chalkboard all you have to do is play the white note underneath that particular finger.
There’s no need to look at your finger as you press the key down. But, if you insist on looking… I’ll allow it just this once if you are a complete beginner. But I really don’t recommend it as we proceed further through our beginner lessons for piano.
Again we don’t need to be fancy here. We’re trying to focus on playing the notes accurately, evenly, one right after the other (legato). It’s even better, if you can play these notes well without looking at your hand.
Once you feel comfortable with this exercise, let’s move on to the next chalkboard exercise in our beginner lessons for piano series.
Exercise Two
For our second chalkboard, notice that we again have fifteen numbers representing fifteen notes on our piano keyboard. But this time, our sequence of notes is a little more scattered around and not as “linear” as our first exercise (that’s because I’m testing you)… ha ha!
 Again, with your fingers fixed in proper C Major position (1st position), slowly play each note with even time and velocity for every note.
The more you can play these exercises without glancing at your fingers the faster you will develop a “feel” for piano playing.
Oh, and don’t mind the “Play, Pause & Stop” buttons on the left. These are left-over relics of the old flash animation I created back in 2007 (old school stuff).
“Flash.. what’s that?” you might be thinking. Well never mind.. just try to concentrate on playing each note evenly and with equal pressure.
Watch Me Demonstrate How Both
These Exercises Should Be Played:
Be sure to practice these first two chalkboards until you can play them without any mistakes. When you feel comfortable with the material on this page, click ahead to Get Piano Lesson 4 to continue with your next set of right hand beginner lessons for piano…
Free Beginner Lessons for Piano – Right Hand 1
Welcome to Get Piano Lesson 3. Here we’ll work on a series of beginner lessons for piano to develop our fingering ability and hand-eye coordination by playing 5-note finger patterns in the C Major position.
In order to perform these exercises properly, we will essentially be learning the beginnings of sight-reading. But as I promised on my homepage, I will not bore you with the tedious note reading, key signatures, sharps, flats, rests, or trying to figure out which note gets a half or whole beat.
No, I will cover that brilliant stuff much later on after we’ve first had a chance to do the fun stuff!
If possible, try to position your computer or laptop next to your piano keyboard to get the most out of these online beginner lessons for piano.
Want to Watch a Brief Introduction to
Sight-Reading? Check This Video Out!
Right Hand
Since the right hand is often the lead hand when it comes to piano playing, we’re going to begin our first set of exercises with our right hand in the C major position on the keyboard.
First, it’s important to remember how we’ve arranged our fingers into an easy to understand numbered fingering system:
No. 1 = Thumb
No. 2 = Index finger
No. 3 = Middle finger
No. 4 = Ring finger
No. 5 = Little finger
Exercise One
Now we’re going to really begin to drill the numbering system into our heads by playing a series of five short beginner lessons for piano. Take a look at the fifteen numbers written on the green chalkboard below…
Each number represents a note on your keyboard that will be played by the appropriate right hand finger. Number 1, which will be played with our thumb, is obviously Middle C.
We don’t need to be concerned with the names of the other four numbers to the right of Middle C at this time.
All we need to know at this point is
which fingers will play those other four notes.
Our “numbered finger system” makes that very easy to understand as we play these beginner lessons for piano.
With your right hand locked in the Middle C position (Position 1) on your piano keyboard, study the fifteen numbers written on the chalkboard. Slowly begin to play each note one by one…
Remember to keep your fingers curved and you wrists up. Play each note steadily and evenly, without looking at your fingers.
Sound hard to do? Actually, if you’ve got all five fingers placed exactly where they should be, this couldn’t be easier. You already know that your middle finger is number 3 and that your index finger is number 2.
So when you see number 2 or 3 one the chalkboard all you have to do is play the white note underneath that particular finger.
There’s no need to look at your finger as you press the key down. But, if you insist on looking… I’ll allow it just this once if you are a complete beginner. But I really don’t recommend it as we proceed further through our beginner lessons for piano.
Again we don’t need to be fancy here. We’re trying to focus on playing the notes accurately, evenly, one right after the other (legato). It’s even better, if you can play these notes well without looking at your hand.
Once you feel comfortable with this exercise, let’s move on to the next chalkboard exercise in our beginner lessons for piano series.
Exercise Two
For our second chalkboard, notice that we again have fifteen numbers representing fifteen notes on our piano keyboard. But this time, our sequence of notes is a little more scattered around and not as “linear” as our first exercise (that’s because I’m testing you)… ha ha!
Again, with your fingers fixed in proper C Major position (1st position), slowly play each note with even time and velocity for every note.
The more you can play these exercises without glancing at your fingers the faster you will develop a “feel” for piano playing.
Oh, and don’t mind the “Play, Pause & Stop” buttons on the left. These are left-over relics of the old flash animation I created back in 2007 (old school stuff).
“Flash.. what’s that?” you might be thinking. Well never mind.. just try to concentrate on playing each note evenly and with equal pressure.
Watch Me Demonstrate How Both
These Exercises Should Be Played:
Be sure to practice these first two chalkboards until you can play them without any mistakes. When you feel comfortable with the material on this page, click ahead to Get Piano Lesson 4 to continue with your next set of right hand beginner lessons for piano…
Free Beginner Lessons for Piano – Right Hand 1
Welcome to Get Piano Lesson 3. Here we’ll work on a series of beginner lessons for piano to develop our fingering ability and hand-eye coordination by playing 5-note finger patterns in the C Major position.

In order to perform these exercises properly, we will essentially be learning the beginnings of sight-reading.
As I promised on my homepage, I will not bore you with the tedious note reading, key signatures, sharps, flats, rests, or trying to figure out which note gets a half or whole beat.
No, I will cover that brilliant stuff much later on after we’ve first had a chance to do the fun stuff!
If possible, try to position your computer or laptop next to your piano keyboard to get the most out of these online beginner lessons for piano.
Want to Watch a Brief Introduction to Sight-Reading? Check This Video Out!
Right Hand
Since the right hand is often the lead hand when it comes to piano playing, we’re going to begin our first set of exercises with our right hand in the C major position on the keyboard.
First, it’s important to remember how we’ve arranged our fingers into an easy to understand numbered fingering system:
No. 1 = Thumb
No. 2 = Index finger
No. 3 = Middle finger
No. 4 = Ring finger
No. 5 = Little finger
Exercise One
Now we’re going to really begin to drill the numbering system into our heads by playing a series of five short beginner lessons for piano. Take a look at the fifteen numbers written on the green chalkboard below…
Each number represents a note on your keyboard that will be played by the appropriate right hand finger. Number 1, which will be played with our thumb, is obviously Middle C.
We don’t need to be concerned with the names of the other four numbers to the right of Middle C at this time.
All we need to know at this point is
which fingers will play those other four notes.
Our “numbered finger system” makes that very easy to understand as we play these beginner lessons for piano.
With your right hand locked in the Middle C position (Position 1) on your piano keyboard, study the fifteen numbers written on the chalkboard. Slowly begin to play each note one by one…
Remember to keep your fingers curved and you wrists up. Play each note steadily and evenly, without looking at your fingers.
Sound hard to do? Actually, if you’ve got all five fingers placed exactly where they should be, this couldn’t be easier.
You already know that your middle finger is number 3 and that your index finger is number 2.
So when you see number 2 or 3 one the chalkboard all you have to do is play the white note underneath that particular finger.
There’s no need to look at your finger as you press the key down. But, if you insist on looking… I’ll allow it just this once if you are a complete beginner.
But I really don’t recommend it as we proceed further through our beginner lessons for piano.
Again we don’t need to be fancy here. We’re trying to focus on playing the notes accurately, evenly, one right after the other (legato). It’s even better, if you can play these notes well without looking at your hand.
Once you feel comfortable with this exercise, let’s move on to the next chalkboard exercise in our beginner lessons for piano series.
Exercise Two
For our second chalkboard, notice that we again have fifteen numbers representing fifteen notes on our piano keyboard. But this time, our sequence of notes is a little more scattered around and not as “linear” as our first exercise (that’s because I’m testing you)… ha ha!
Again, with your fingers fixed in proper C Major position (1st position), slowly play each note with even time and velocity for every note.
The more you can play these exercises without glancing at your fingers the faster you will develop a “feel” for piano playing.
Oh, and don’t mind the “Play, Pause & Stop” buttons on the left. These are left-over relics of the old flash animation I created back in 2007 (old school stuff).
“Flash.. what’s that?” you might be thinking. Well never mind.. just try to concentrate on playing each note evenly and with equal pressure.
Watch Me Demonstrate How Both These Exercises Should Be Played:
Be sure to practice these first two chalkboards until you can play them without any mistakes. When you feel comfortable with the material on this page click ahead to Get Piano Lesson 4 to continue with your next set of right hand beginner lessons for piano…