Free Beginner Lessons for Piano – Left Hand 1
 Welcome to Get Piano Lesson 5. Here we’ll continue our beginner lessons for piano by developing our fingering ability and hand-eye coordination with our left hand.
I recommend you position your computer or laptop close to your piano keyboard in order to closely follow these online beginner lessons for piano.
But first, Allow Me to Demonstrate How to
Begin Sight-Reading With the Left Hand:
Left Hand
Let’s begin these exercises with our left hand resting in the C position on the keyboard. We are starting at the C position (first position) located seven notes to the left of middle C as indicated in this diagram:
Remember that the “numbered finger system” for the right hand is also identical for the left hand:
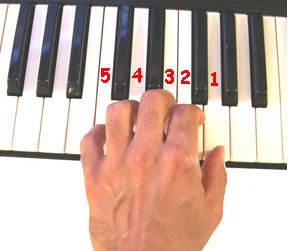 No. 1 = Thumb
No. 2 = Index finger
No. 3 = Middle finger
No. 4 = Ring finger
No. 5 = Little finger
Exercise One
Let’s begin with our first left-handed beginner lessons for piano. Take a look at the fifteen numbers written on this chalkboard. You may notice, (from your recollection of our right hand exercises) that this chalkboard looks similar to our first right-handed chalkboard.
The main difference is that the numbers seem to be reversed. Instead of starting with a number 1, we’re starting with a number 5, and this time, number 5 is played with our left little finger instead of our thumb.
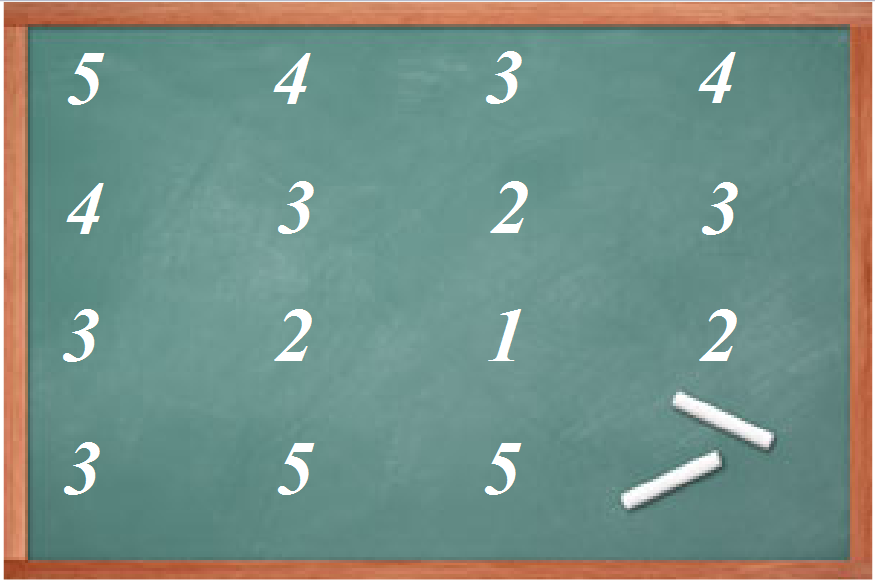
With your left hand resting in the C Position (Position 1) on your piano keyboard, keep watching the fifteen numbers written on the chalkboard, and slowly begin to play each note one by one.
As you play these exercises, remember to keep your fingers curved and you wrists up. Play each note steadily and evenly, without looking at your fingers.
If you’ve got all five fingers placed correctly on their properly assigned keys, you’ll find that you won’t need to look down at your fingers.
You already know that your left middle finger is number 3 and that your left index finger is number 2. So when you see number 2 or 3 one the chalkboard all you have to do is play that finger. If your finger is sitting correctly on the key it is assigned to, you’ll strike the correct note.
However, if you really feel the need to “peek” in the beginning, do it sparingly. But I really don’t recommend it during these beginner lessons for piano.
When you’re comfortable with this exercise, move on to your next chalkboard pattern in this beginner lessons for piano series.
Exercise Two
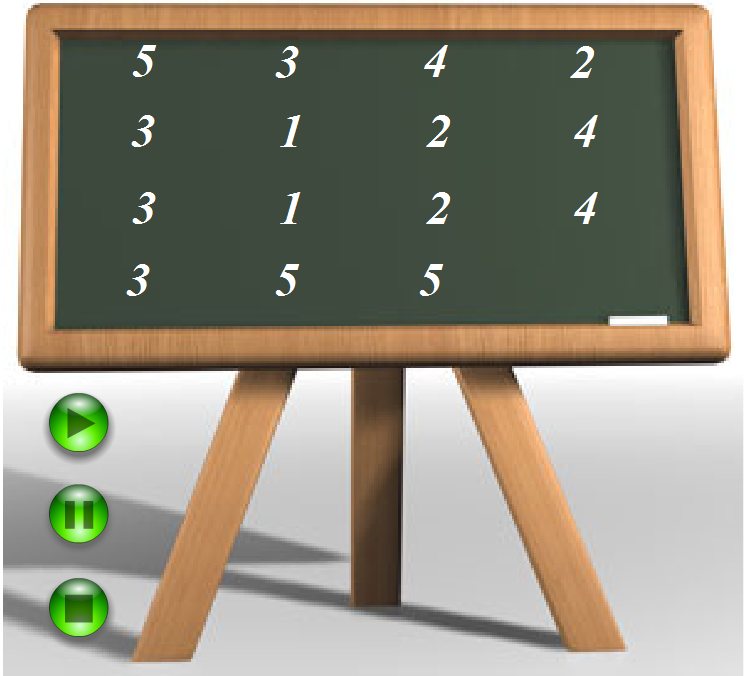 You may notice that our second left-handed chalkboard assignment is a bit more challenging than our previous exercise.
This sequence of notes is more jumbled around and not quite as “linear” as our first left-handed note pattern.
Again, with your fingers resting on the appropriate keys within the C position (first position), begin to slowly play this note pattern steadily and accurately.
Each note should be played with the same duration and volume level as the next one.
Practice this exercise until you can play it without any mistakes. Oh, and don’t worry about the “Play, Pause & Stop” buttons down at the left side. These are just left-over relics of the old flash animations I used to create back in 2007 (old school stuff).
And when you can play these first two chalkboards correctly and smoothly, Click ahead to Get Piano Lesson 6 to continue with your next set of left handed beginner lessons for piano…
Watch My Demonstrate How to Play
This Exercise With the Left Hand:
Free Beginner Lessons for Piano – Left Hand 1
Welcome to Get Piano Lesson 5. Here we’ll continue our beginner lessons for piano by developing our fingering ability and hand-eye coordination with our left hand.
I recommend that you position your computer or laptop close to your piano keyboard in order to closely follow along with these online beginner lessons for piano.
But first, Allow Me to Demonstrate How to
Begin Sight-Reading With the Left Hand:
Left Hand
Let’s begin these exercises with our left hand resting in the C position on the keyboard. We are starting at the C position (first position) located seven notes to the left of middle C as indicated in this diagram:
Remember that the “numbered finger system” for the right hand is also identical for the left hand:
No. 1 = Thumb
No. 2 = Index finger
No. 3 = Middle finger
No. 4 = Ring finger
No. 5 = Little finger
Exercise One
Let’s begin with our first left-handed beginner lessons for piano. Take a look at the fifteen numbers written on this chalkboard. You may notice, (from your recollection of our right hand exercises) that this chalkboard looks similar to our first right-handed chalkboard.
The main difference is that the numbers seem to be reversed. Instead of starting with a number 1, we’re starting with a number 5, and this time, number 5 is played with our left little finger instead of our thumb.
With your left hand resting in the C Position (Position 1) on your piano keyboard, keep watching the fifteen numbers written on the chalkboard, and slowly begin to play each note one by one.
As you play these exercises, remember to keep your fingers curved and you wrists up. Play each note steadily and evenly, without looking at your fingers.
If you’ve got all five fingers placed correctly on their properly assigned keys, you’ll find that you won’t need to look down at your fingers.
You already know that your left middle finger is number 3 and that your left index finger is number 2. So when you see number 2 or 3 one the chalkboard all you have to do is play that finger. If your finger is sitting correctly on the key it is assigned to, you’ll strike the correct note.
However, if you really feel the need to “peek” in the beginning, do it sparingly. But I really don’t recommend it during these beginner lessons for piano.
When you’re comfortable with this exercise, move on to your next chalkboard pattern in this beginner lessons for piano series.
Exercise Two
You may notice that our second left-handed chalkboard assignment is a bit more challenging than our previous exercise. This sequence of notes is more jumbled around and not quite as “linear” as our first left-handed note pattern.
Again, with your fingers resting on the appropriate keys within the C position (first position), begin to slowly play this note pattern steadily and accurately.
Each note should be played with the same duration and volume level as the next one.
Practice this exercise until you can play it without any mistakes. Oh, and don’t worry about the “Play, Pause & Stop” buttons down at the left side. These are just left-over relics of the old flash animations I used to create back in 2007 (old school stuff).
And when you can play these first two chalkboards correctly and smoothly, Click ahead to Get Piano Lesson 6 to continue with your next set of left handed beginner lessons for piano…
Watch My Demonstrate How to Play
This Exercise With the Left Hand:
Free Beginner Lessons for Piano – Left Hand 1

Welcome to Get Piano Lesson 5. Here we’ll continue our beginner lessons for piano by developing our fingering ability and hand-eye coordination with our left hand.
I recommend that you position your computer or laptop close to your piano keyboard in order to closely follow along with these online beginner lessons for piano.
But first, Let Me Demonstrate How to Begin Sight-Reading With the Left Hand:
Left Hand
Let’s begin these exercises with our left hand resting in the C position on the keyboard.
We are starting at the C position (first position) located seven notes to the left of middle C as indicated in this diagram:
Remember that the “numbered finger system” for the right hand is also identical for the left hand:
No. 1 = Thumb
No. 2 = Index finger
No. 3 = Middle finger
No. 4 = Ring finger
No. 5 = Little finger
Exercise One
Let’s begin with our first left-handed beginner lessons for piano. Take a look at the fifteen numbers written on this chalkboard.
You may notice, (from your recollection of our right hand exercises) that this chalkboard looks similar to our first right-handed chalkboard.
The main difference is that the numbers seem to be reversed. Instead of starting with a number 1, we’re starting with a number 5, and this time, number 5 is played with our left little finger instead of our thumb.
With your left hand resting in the C Position (Position 1) on your piano keyboard, keep watching the fifteen numbers written on the chalkboard, and slowly begin to play each note one by one.
As you play these exercises, remember to keep your fingers curved and you wrists up. Play each note steadily and evenly, without looking at your fingers.
If you’ve got all five fingers placed correctly on their properly assigned keys, you’ll find that you won’t need to look down at your fingers.
You already know that your left middle finger is number 3 and that your left index finger is number 2. So when you see number 2 or 3 one the chalkboard all you have to do is play that finger.
So if your finger is sitting correctly on the key it is assigned to, you’ll strike the correct note.
However, if you really feel the need to “peek” in the beginning, do it sparingly. But I really don’t recommend it during these beginner lessons for piano.
When you’re comfortable with this exercise, move on to your next chalkboard pattern in this beginner lessons for piano series.
Exercise Two
You may notice that our second left-handed chalkboard assignment is a bit more challenging than our previous exercise. This sequence of notes is more jumbled around and not quite as “linear” as our first left-handed note pattern.
Again, with your fingers resting on the appropriate keys within the C position (first position), begin to slowly play this note pattern steadily and accurately. Each note should be played with the same duration and volume level as the next one.
Practice this exercise until you can play it without any mistakes. Oh, and don’t worry about the “Play, Pause & Stop” buttons down at the left side. These are just left-over relics of the old flash animations I used to create back in 2007 (old school stuff).
And when you can play these first two chalkboards correctly and smoothly, Click ahead to Get Piano Lesson 6 to continue with your next set of left handed beginner lessons for piano…
Watch My Demonstrate How to Play This Exercise With the Left Hand: